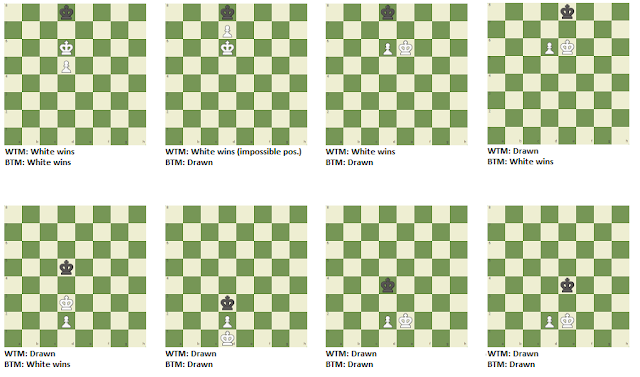
My idea is to memorize a few key king and pawn positions and then rely on visualization to "build out" from there. The purpose of this post is to show the fundamental positions and to explain why they're winning or drawing. In all these exercises white has the extra pawn so that is the side playing for victory while black is trying to defend for a draw with their lone king.
The Building Blocks
(NOTE: For now, just know that rook-pawns are special cases that are often drawn so we'll focus on middle pawns)
Verdict: Winning for white
No matter whose turn, white should win.
Verdict: Drawn
This position can only be reached from white playing Kd6 so it must be black's turn and it is a stalemate position. Of course, if it was somehow white's turn, Ke6 or Kc6 forces the black king to give up d8.
Verdict: White to move will win. Black to move will draw.
If white to move, it's winning but he must first move his pawn to d7. That forces black to play Kc7 and white can then bring his king to e7 and guard the promotion square. If black to move then Ke8 draws because black gains the opposition. The losing move is Kc8, allowing Ke7 for white (and not d7+??)
Translating the Building Blocks
Wouldn't it be nice if you could move these positions further down the board and the verdict remained the same with correct play? Well, it doesn't really work like that because in those cases, black's king will have more space to move backwards and the idea of opposition becomes more important--namely the criterion of whose turn it is.
Verdict: Black to move will lose for black. White to move will draw.
This is NOT fully winning for white as it was in the original Position 1. The opposition comes into play now that black is not backed up to the wall on the 8th rank now as in the original position 1. This position now depends on whose turn it is.
Verdict: Drawn
If black to move, technically white has opposition here but white cannot maintain it because if black moves directly backwards--as they always should in these positions--white has to move his king to c2 or e2 and give up the opposition.
Verdict: Drawn
If black to move, he can gain opposition by Ke4 and draw the game. If white to move, a pawn push means black can just retreat on the d-file and anytime white's king tries to advance black can gain the opposition.
A conclusion you could draw is that, as long as there's space for black's king to retreat, he is generally going to draw if he can get his king in front of the pawn and get and maintain opposition.
Cheat Sheet
Here are those positions all in one simple image. This needs to be memorized:

For rook-pawn endgames (meaning a-pawns or h-pawns), just know that if the enemy king gets in front of the pawn's path, it's a draw.
An idea for practicing endings:
Lichess mobile app (I have yet to find this feature on the desktop site) > Board Editor > Gear button.
There will be a dropdown menu for a ton of endgame positions you can choose. They have 14 different single-pawn endings you can practice against a computer or view in the analysis board! What I do is display each one and decide if it's winning or drawn if it's white to move, then if it's drawn or lost if it's black to move. Then I might play through it against the computer for the winning side, and if it can be drawn, I play as the side going for the draw. I might also pull it up in analysis board after I determine if it's winning or drawn and then see if I can test myself on other moves and if they're still winning or if there are losing moves in the position, and any other tricks one side might have.
More Practice
I made a huge list of king and pawn endgame positions that have the position of a white pawn, white king and black king, whose on move, whether it's winning for white or a draw, and what the best move is if there is a non-obvious critical move to win/draw. It's great because it forces you to visualize the position, much like you might have to do in a game if you have the choice to head into a pawn-up endgame. Take a look at the spreadsheet. To study, I cover up the Verdict and Best Move columns, visualize the given position, then decide if it's winning and/or what the critical move is. There are a ton, so look at this like a test. Obviously the same building block positions are repeated over and over again but I translated them up and down the board and even included some rook-pawn positions! (See bottom of this post for the same list in a different order to help randomize studying)
NOTE: The best move for row 62 should say "Kd6/Kf6"
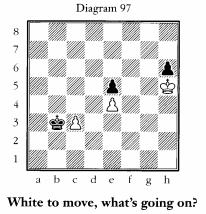
Two Examples
To tie this all together, here are two example exercises that should highlight the importance of knowing the basic building blocks:
1) If white to move, what should they play and what is the result with correct play?
2) If black to move, what should they play and what is the result with correct play?
Solution: If it's white's turn, it's a forced draw with correct play so it doesn't matter what they play. If it's black, they can draw but they must play Ke6 to get the distant opposition and not allow white to advance safely.
The next is from a daily puzzle on chess.com. The first question you should ask yourself is it okay for white to trade rooks here?
You should be able to visualize that doing so will result in black's king on c5 with white to move. If white plays Kd3, black can play Kd5 with the opposition and white has no good move that will give a favorable position that we've seen in this post. But white has other king moves....
Solution:
1. Rxc5+ Kxc5
2. Kf3! Kd5
3. Kf4 Ke6
4. Ke4 with a favorable king position!
To wrap this all up, here's a great video by John Bartholomew that covers the topic of king and pawn versus king: https://www.youtube.com/watch?v=aLyRWZPXUzI&list=PLl9uuRYQ-6MDzm-bs8kbyHdYEmRGUauot&index=8
Pawn and King Endgame Spreadsheet Pt. Deux
NOTE: The best move for row 62 should say "Kd6/Kf6"


